

🚀 AWS - Optimizing Web App Performance with AWS CloudFront, New Relic Monitoring, and Terraform Deployment

🚀 Introduction
In today's rapidly evolving digital landscape, deploying web applications efficiently and ensuring optimal performance is essential for delivering a seamless user experience. This project aims to address these critical aspects by leveraging Infrastructure as Code (IAC) through Terraform, harnessing the content delivery power of AWS CloudFront, and implementing robust monitoring using New Relic.
🎯 Objective
The objective of this post is to bring and spread a knowledge about #aws cloud services, how to ? and where to consume the #aws services to solve the real world business challenges
🚀 Use Case:
Manual Deployment
Terraform (IaC) Deployment
New Relic Integration
This project aims to address these critical aspects by leveraging Infrastructure as Code (IAC) through Terraform, harnessing the content delivery power of AWS CloudFront, and implementing robust monitoring using New Relic.
Automated deployment of web applications is at the heart of this initiative, as it not only streamlines the provisioning of cloud infrastructure but also lays the foundation for future scalability across multiple cloud platforms, free from vendor lock-in constraints. By utilizing Terraform, a cloud-agnostic open-source tool, we ensure that our infrastructure can adapt to evolving requirements seamlessly.
The project also emphasizes the acceleration of web application performance through AWS CloudFront, a content delivery network (CDN) service. By strategically caching content at edge locations around the world, CloudFront enhances the user experience, minimizing latency and ensuring swift content delivery.
To maintain a vigilant eye on the performance and health of our web application, we integrate New Relic monitoring. This comprehensive tool provides us with invaluable insights into infrastructure visibility and response monitoring. With the aid of AWS Lambda functions, we securely send logs from our AWS S3 bucket to New Relic for real-time analysis.
This project not only underscores the importance of automated deployment and performance optimization but also provides a detailed, step-by-step guide for implementing these solutions. Whether you're new to these technologies or a seasoned professional, this project equips you with the knowledge and tools to harness the full potential of Terraform, CloudFront, and New Relic for your web applications.
🛠️ Solution Diagram:
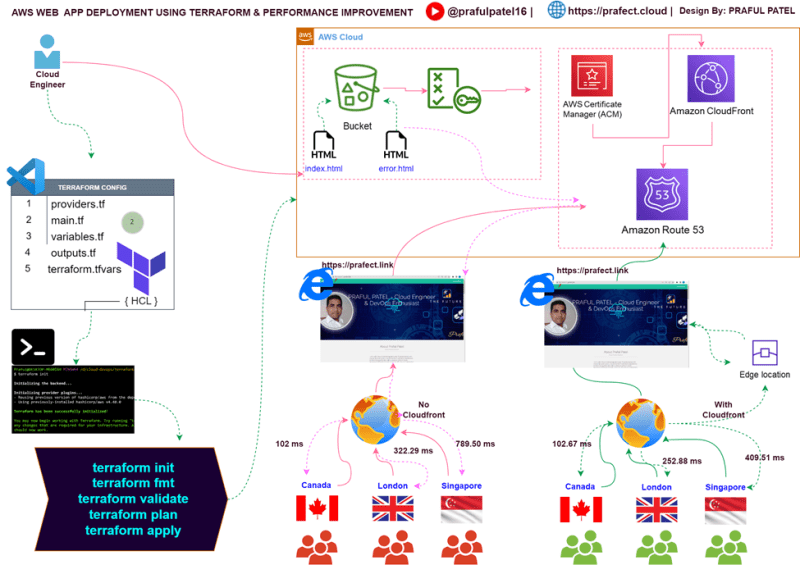
The web application should deploy with the following criteria’s & requirements:
Requirement 1:
- The web application should be deployed within the AWS Cloud platform.
Requirement 2:
- The web application should be accessed securely.
Requirement 3:
- The viewer’s experience should be seamless without any delays while accessing the web content and pages.
Requirement 4:
- The web application should be accessible from around the world with a custom domain: www.prafect.link.
Requirement 5:
- The web application logs should be stored in object storage and then sent to third-party monitoring solutions.
Requirement 6:
- The web application should be deployed in an automated way without any vendor locking tools.
Solution:
Let’s discuss and analyze the solution for the above requirements:
Solution 1: AWS S3
- From the AWS Cloud platform, there is a service called S3, which provides a service to deploy a static web application.
Solution 2: AWS ACM
- AWS ACM is the solution that provides a wildcard certificate through which the web application can be secured with SSL/TLS communication.
Solution 3: AWS Cloudfront
- AWS Cloudfront is the content delivery network service through which the web app content will be cached on edge locations nearby the viewers' proximity to improve the user's experience.
Solution 4: AWS Route 53
- AWS Route 53 provides a DNS service through which the web application can have its own custom domain: www.prafect.link.
Solution 5: AWS S3
- AWS S3 provides a service to store the logs and push the logs to an external monitoring tool. New Relic can be used, where S3 logs will be pushed to New Relic using a Lambda function.
Solution 6: Terraform
- Terraform is the solution to provision the resources and infrastructure in an Infrastructure as Code (IAC) way. It's a cloud-agnostic open-source tool that can further scale up based on the requirements for multi-cloud.
Project Cost Estimation:
(Note: This cost is not any actual cost; it's just an estimation based on high-level requirements. Prices may vary based on adding and removing services based on requirements.)
Ref: AWS Pricing Calculator

Host a Static Website on AWS: Services Costs
Tools & Technologies Covered:
AWS Cloud
AWS S3
AWS Certificate Manager
AWS Cloudfront
AWS Route 53
AWS Lambda
AWS CloudWatch
New Relic (Monitoring)
Terraform (Infrastructure as Code)
Visual Studio Code (IDE)
GitHub
Ref: AWS Services Documentation:
AWS S3: https://docs.aws.amazon.com/AmazonS3/latest/userguide/access-bucket-intro.html
AWS Cloudfront:
https://docs.aws.amazon.com/AmazonCloudFront/latest/DeveloperGuide/GettingStarted.SimpleDistribution.html
Pre-requisite:
AWS Free Tier Account
AWS IAM User created with programmatic access
AWS Route53 hosted domain
Visual Studio Code configured
Latest Terraform version installed
GitHub Account
Gitbash installed on desktop
New Relic account set up
Web application source code ready
AGENDA:
To achieve the goal of explaining the user how to configure each and every service within the console to make them familiar with the ins and outs of all service components, and then to present the automated way in which the entire web application resources are provisioned within a few minutes using Terraform (IaC).
a. Manual way web application configuration and optimizing web speed to accelerate web performance.
b. Automated way using Terraform to deploy the complete web application.

MANUAL DEPLOYMENT
1. Set up Web Application:
Step 1: Register a Custom Domain with Route 53
Step 2: Create Two Buckets
Step 3: Configure Your Root Domain Bucket for Website Hosting
Step 4: Configure Your Subdomain Bucket for Website Redirect
Step 5: Configure Logging for Website Traffic
Step 6: Upload Index and Website Content
Step 7: Upload an Error Document
Step 8: Edit S3 Block Public Access Settings
Step 9: Attach a Bucket Policy
Step 10: Test Your Domain Endpoint
Step 11: Add Alias Records for Your Domain and Subdomain
Step 12: Test the Website
2. Perform Latency Test without Cloudfront:
a. Test from Canada
b. Test from London
c. Test from Singapore
3. Configure Certificate Manager to Make the Website Secure:
a. Request a Certificate
b. Validate - Add CNAME Records to Route53
c. Redirection Bucket – Change the Request Server from HTTP to HTTPS
4. Accelerate Web Performance Using Cloudfront:
a. Create Cloudfront Distribution
b. Validate that Cloudfront Domain is Displayed on the Web
c. Point Cloudfront Endpoint with Route53 Custom Domain
d. Measure the Latency Test with Cloudfront
i. Test from Canada
ii. Test from London
iii. Test from Singapore
Implementation in Action:
- Set up Web application
Step 1: Register a custom domain with Route 53

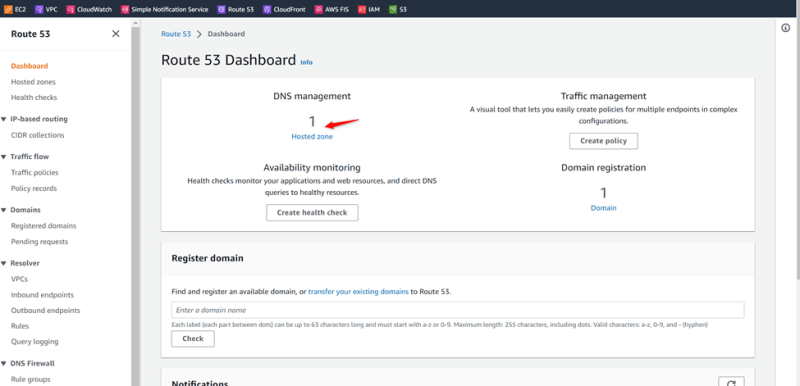
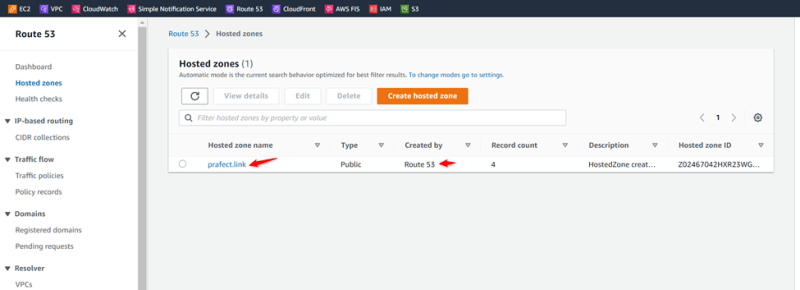

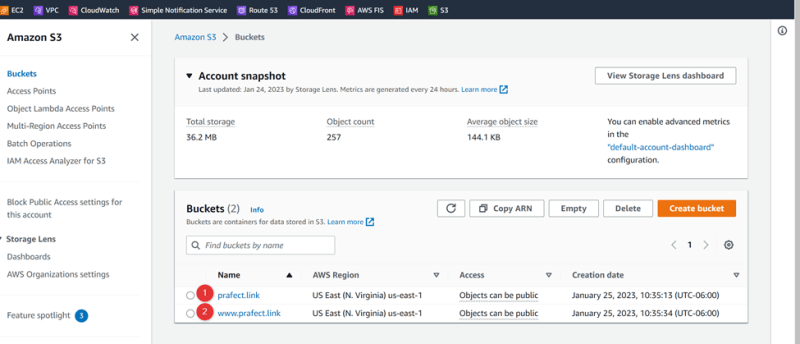
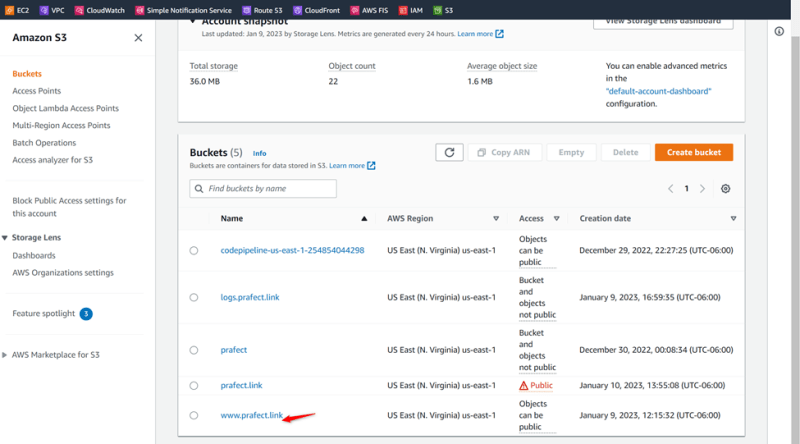
Step 2: Create two buckets
Main bucket: prafect.link
Second bucket: www.prafect.link
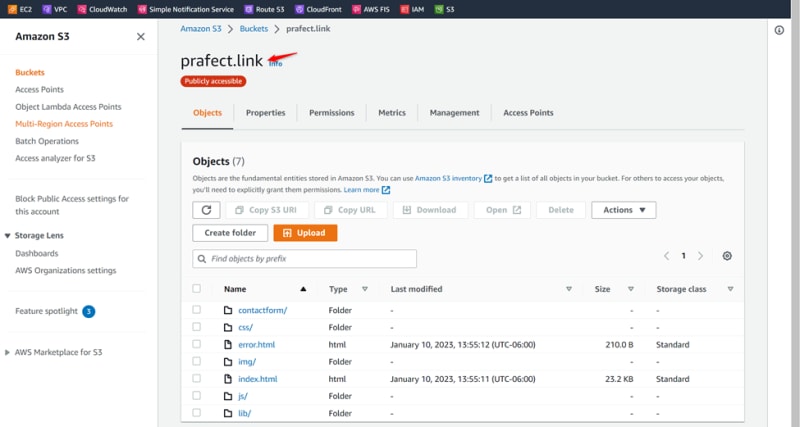
Step 3: Upload index and website content
Step 4: Upload an error document
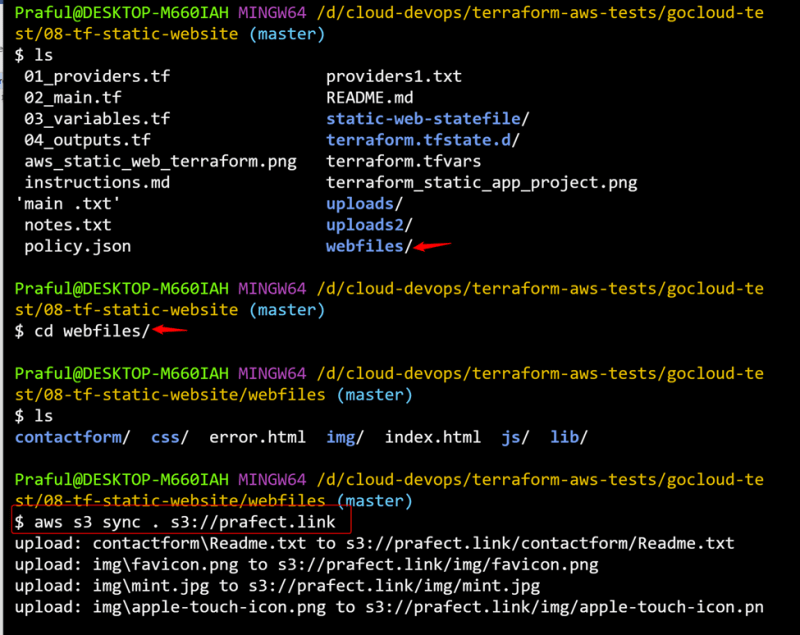
Go to local terminal
AWS Configure : provide credentials
Go to source code directory: webfiles
aws s3 sync . s3://prafect.link
Step 5: Configure your root domain bucket for website hosting
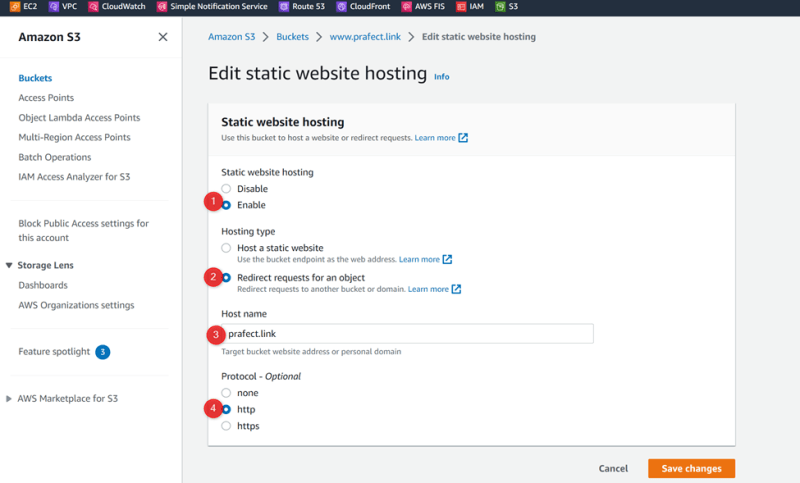
Enable Static web

Step 6: Configure your subdomain bucket for website redirect
Bucket redirection: www.prafect.link
Step 7: Edit S3 Block Public Access settings
Buck Policy:

Step 9: Test your domain endpoint

Verify that “index.html” is displayed the web page
Access web page using endpoint
S3 web endpoint
URL : http://prafect.link.s3-website-us-east-1.amazonaws.com
index.html

Verify that “error.html” is displayed the error page
Access “error.html”
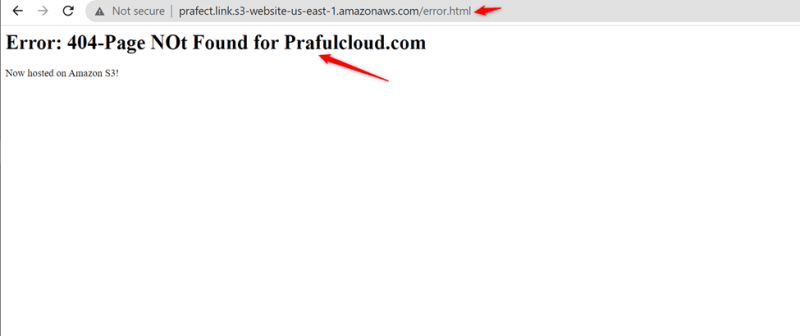
Step 10: Add alias records for your domain and subdomain
Add Custom domain with Route53
Verify that hosted zone exist

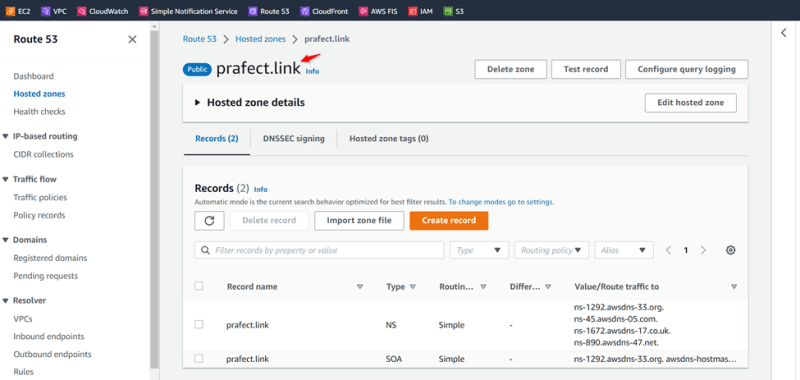
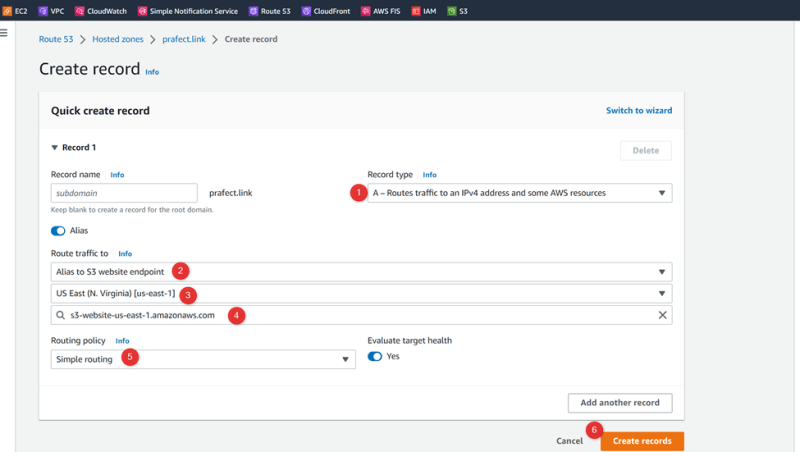
Create A record to add custom domain to web application
Prafect.link
Point out alias to AWS S3 website Endpoint
Create second alias for www.prafect.link

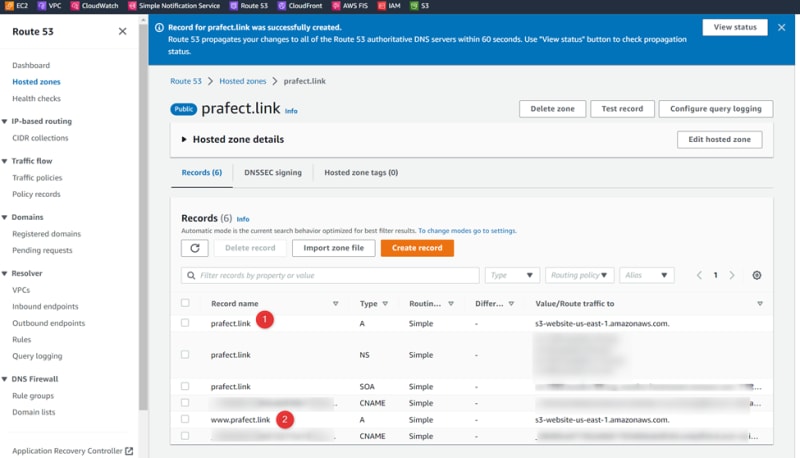
Step 11: Test the website
Access the web application using custom domain
www.prafect.link

- Perform Latency test without Cloudfront a. Test from Canada b. Test from London c. Test from Singapore
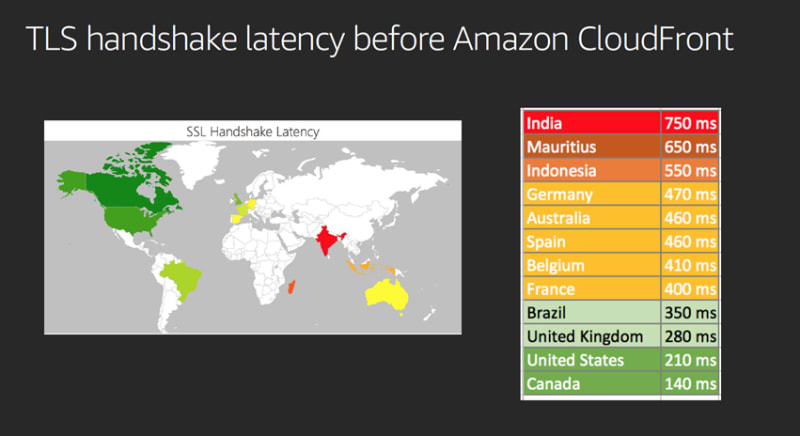
Measure the performance of the web application
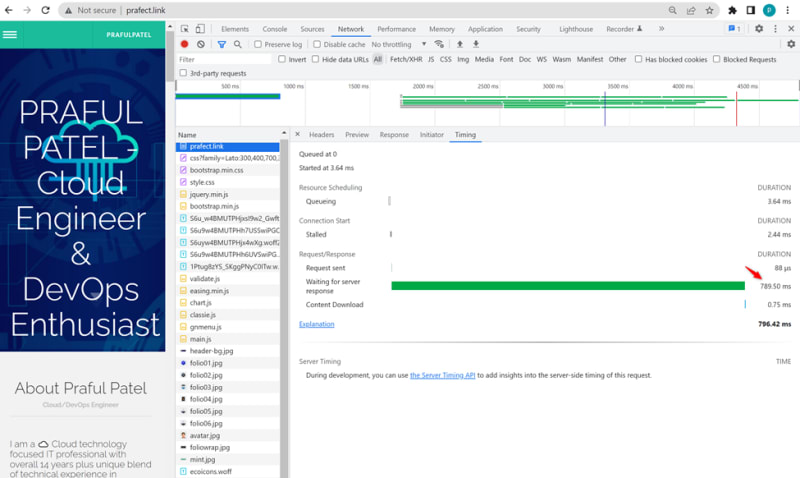
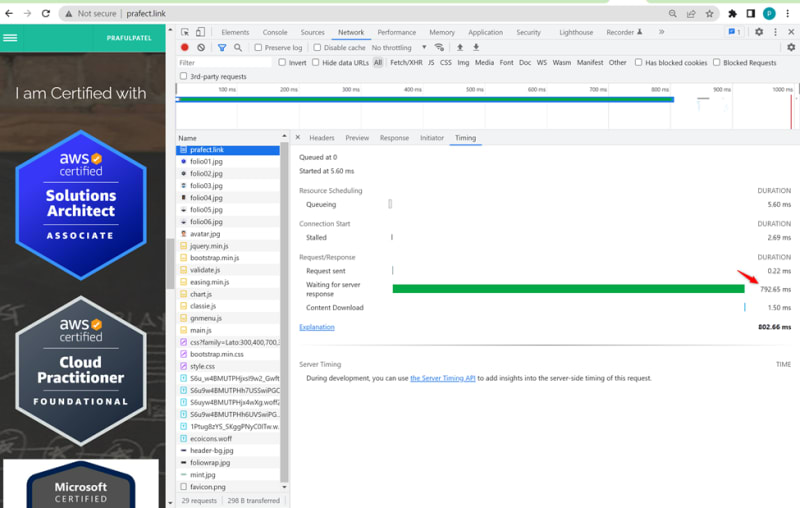
Certainly, here is the performance measurement presented in a table format:
| Origin | Region | Page | DNS (ms) | Connection (ms) | Response (ms) |
| Canada | US-east-1 | Home Page | 189.39 | 102.67 | |
| Contact Us | 48.25 | 154.24 | |||
| Portfolio | 49.70 | 123.31 | |||
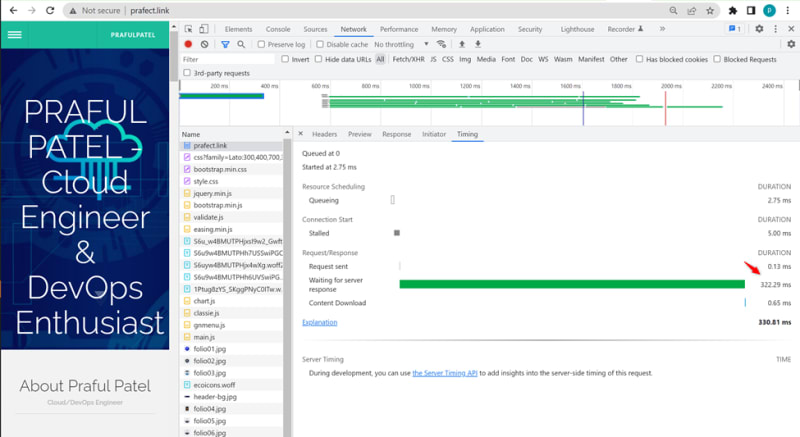
| London | Home Page | 322.29 | |||
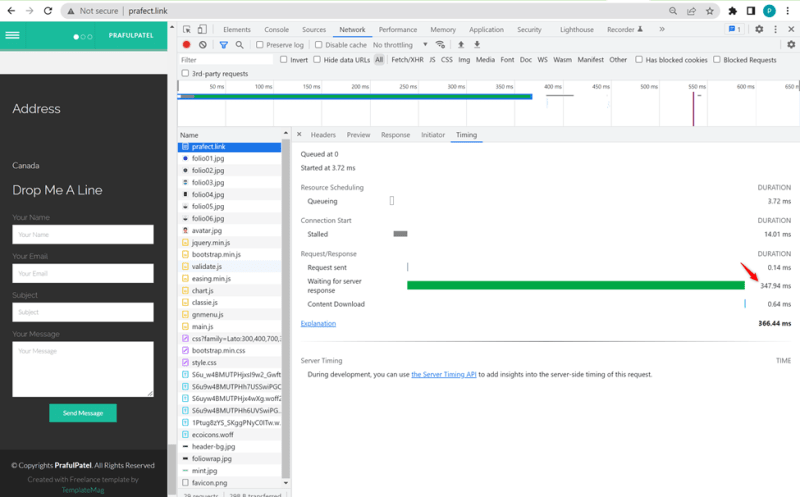
| Contact Us | 347.94 | ||||
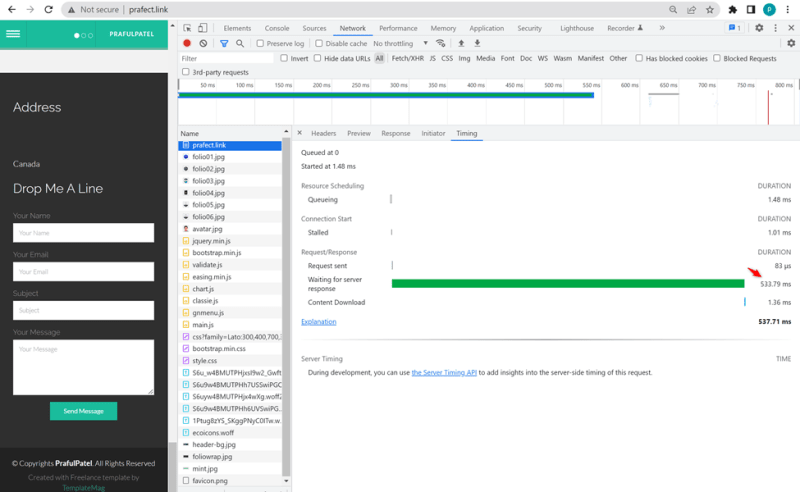
| Portfolio | 533.79 | ||||
| Singapore | Home Page | 789.50 | |||
| Contact Us | 762.48 | ||||
| Portfolio | 792.65 |
Validate response header that it is coming from Amazon S3
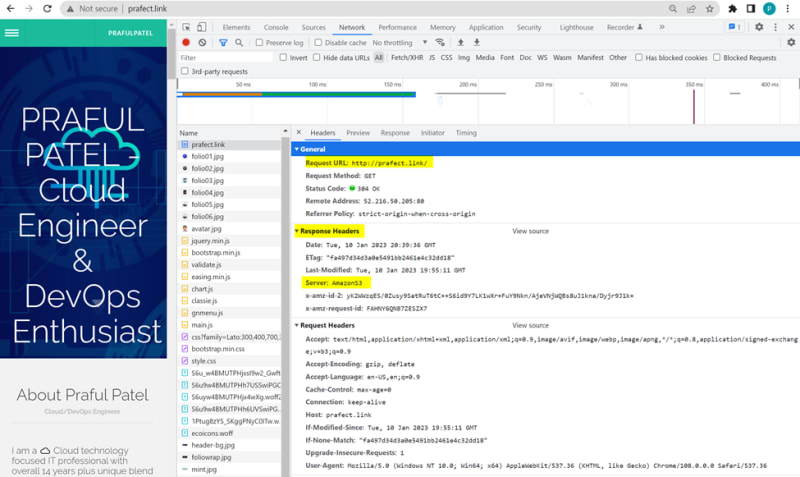
Test 1: Access from Canada
Home Page
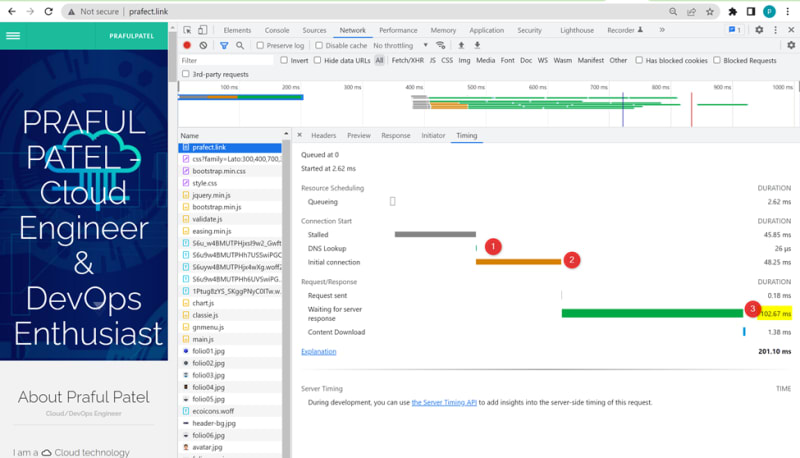
About US

Portfolio
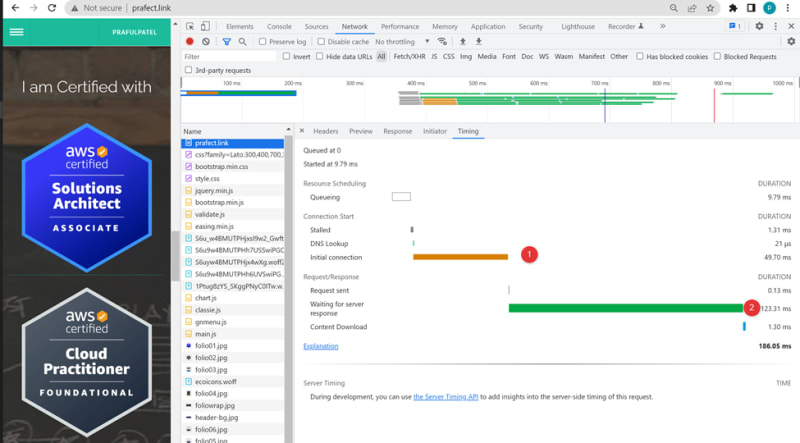
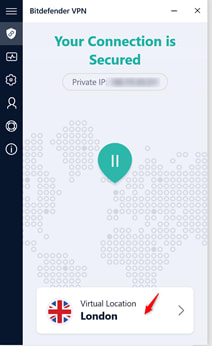
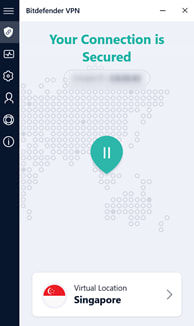
Switch the location using VPN other than Canada to test the latency
Country : London
HomePage
Contact Us
Portfolio
Country: Singapore
HomePage
About Us

Portfolio

3.Configure the Certificate Manager
How to secure Web application?
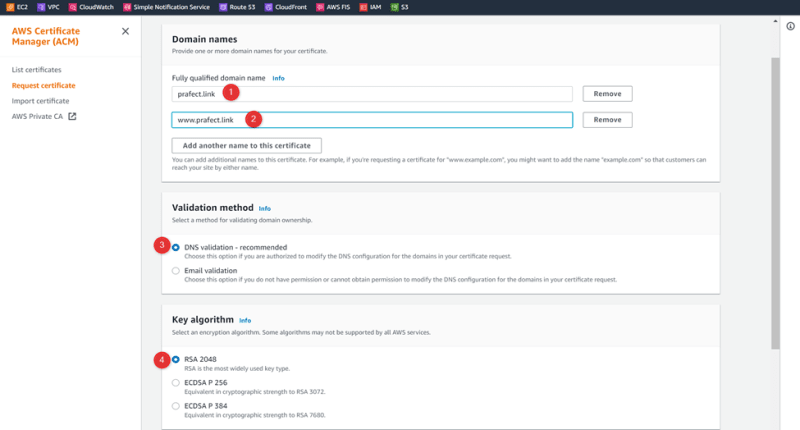
1.Request a certificate
Certificate Manager
SSL Certificate
Request certificate

Status: Pending Validation

2.Create records in Route53

3.Go to Route53 and validate that two CNAME records created

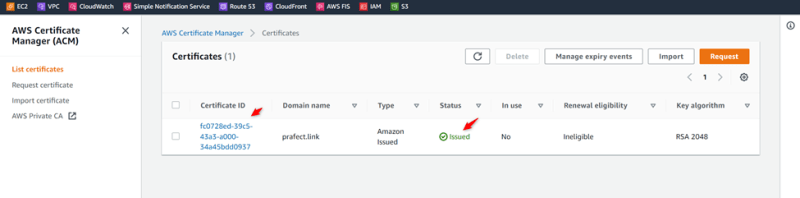
SSL certificate issued successfully
Verify that web application is access using secure https
http://www.prafect.link : not secure
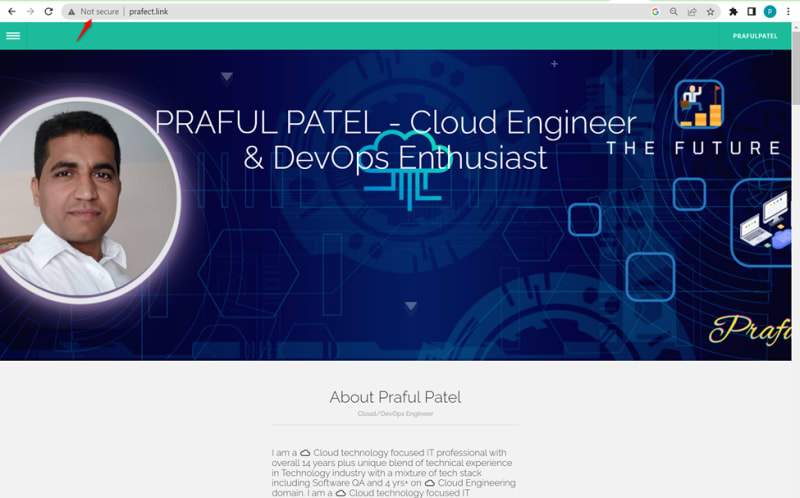
- Do one change on redirection bucket and redirect to “https” Change from “http” to “https”
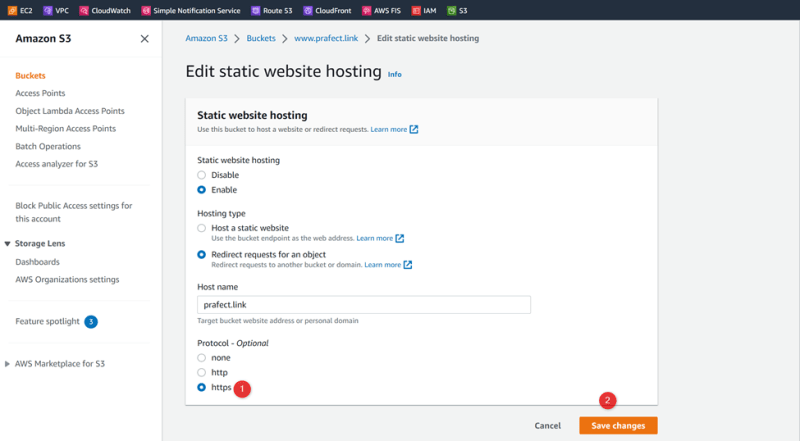

5.Accelerate the web performance using Cloudfront
a. Create cloudfront distribution
b. Validate that cloudfront domain is displayed on the web
c. Point the cloudfront endpoint with the Route53 custom domain
d. Measure the Latency test with Cloudfront
i. Test from Canada
ii. Test from London
iii. Test from Singapore


Create Cloudfront distribution
Origin domain: Provide AWS S3 web endpoint:
http://prafect.link.s3-website-us-east-1.amazonaws.com
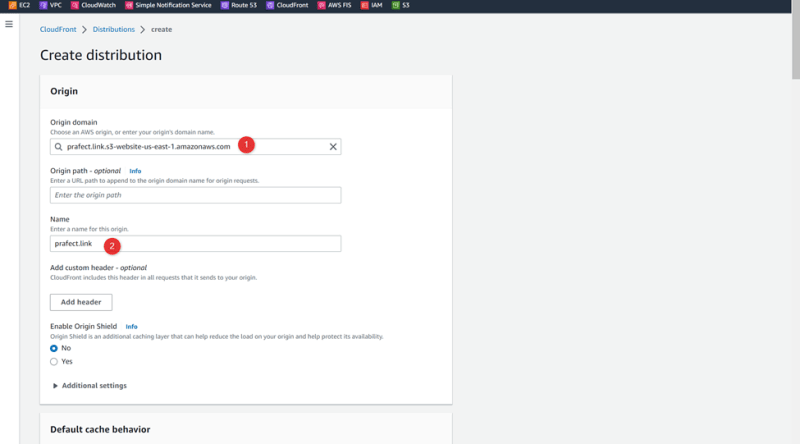
Use only North America and Europe
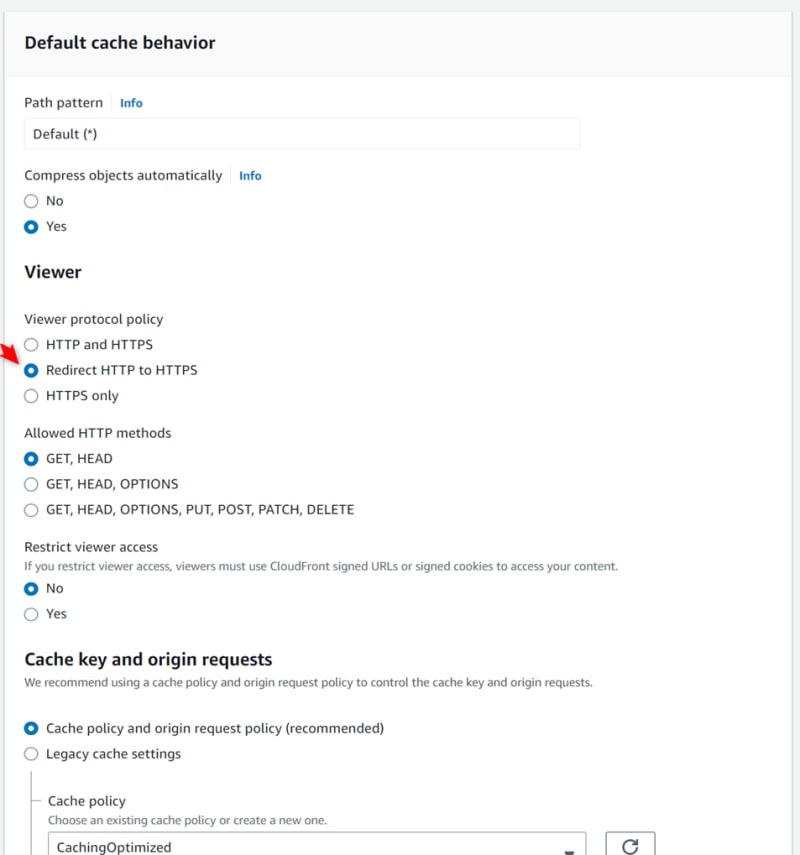

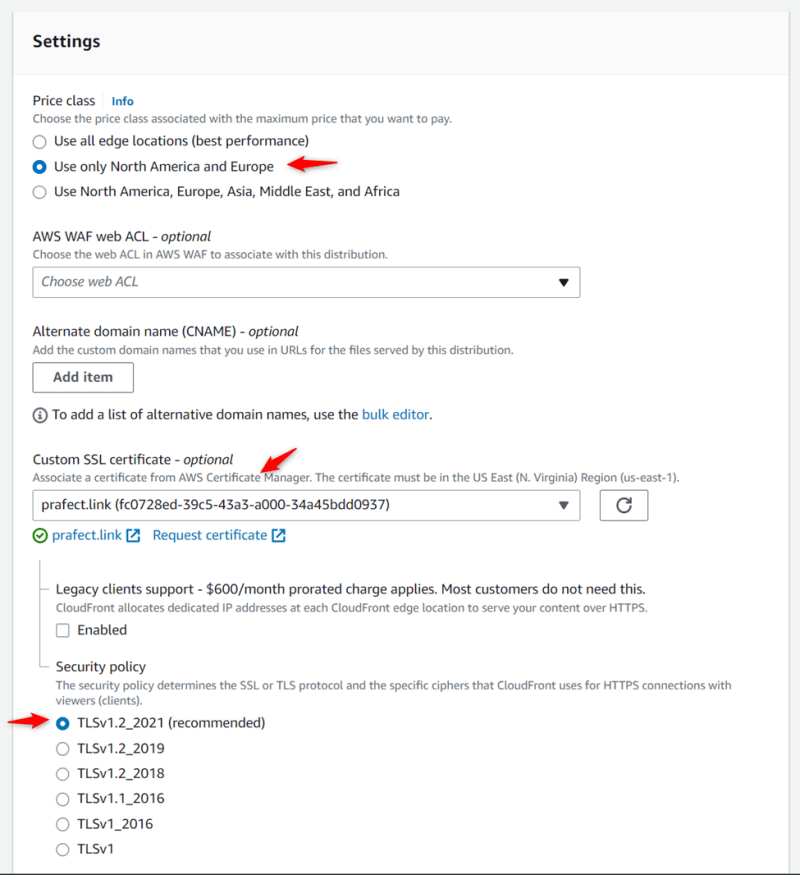
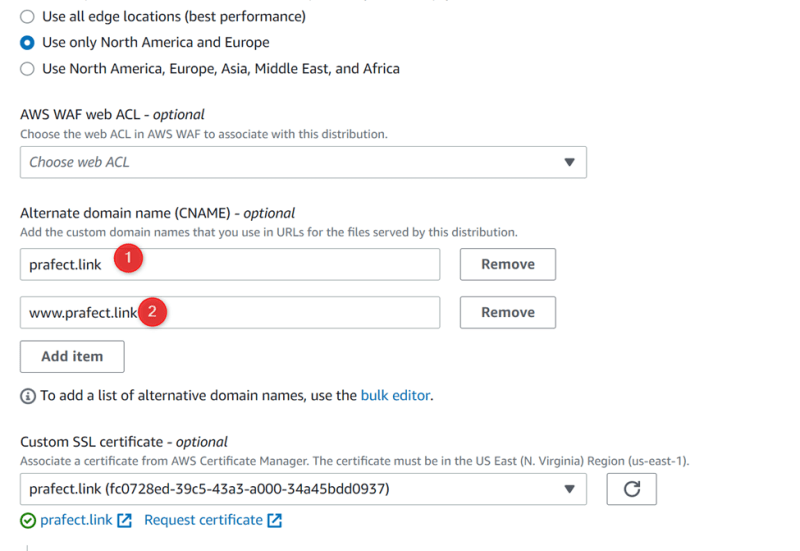

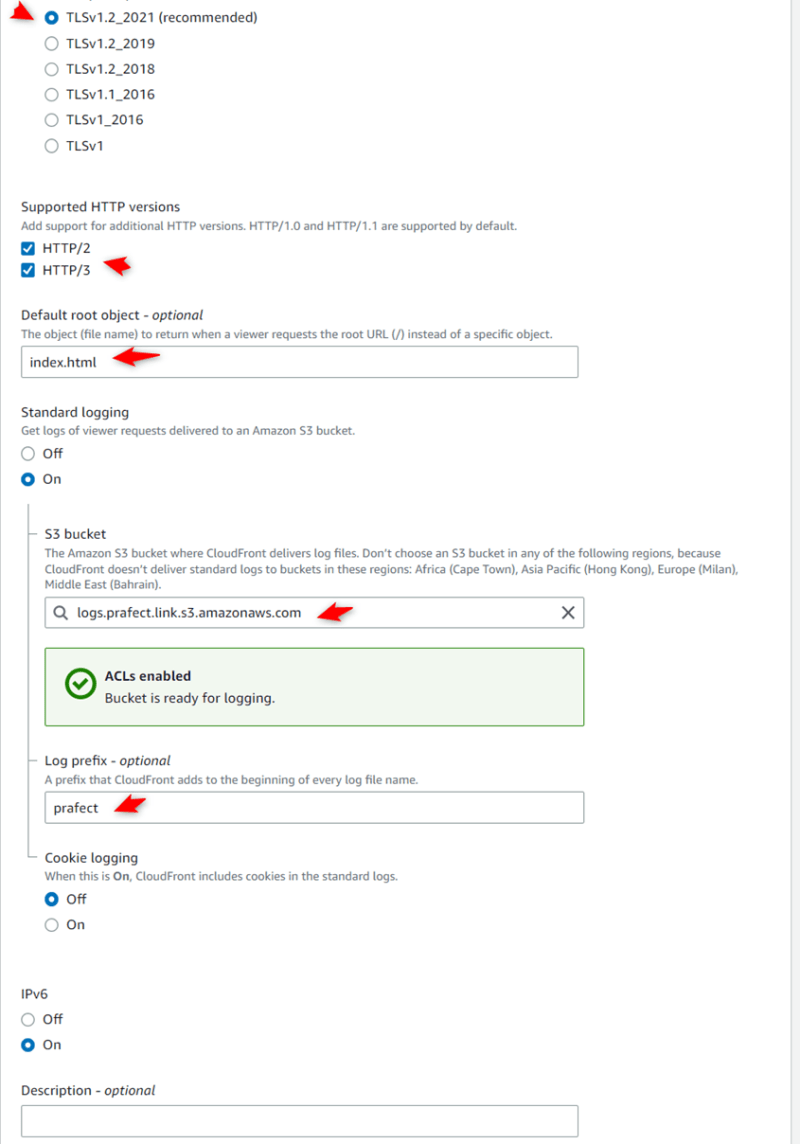
Cloudfront deployment in progress
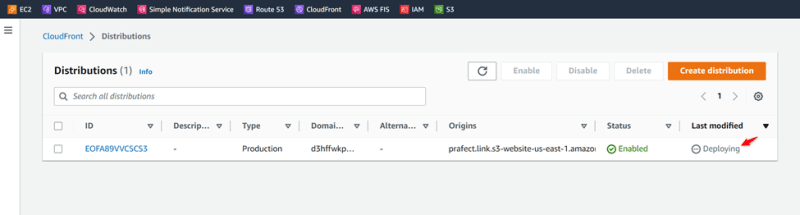
Cloudfront deployed
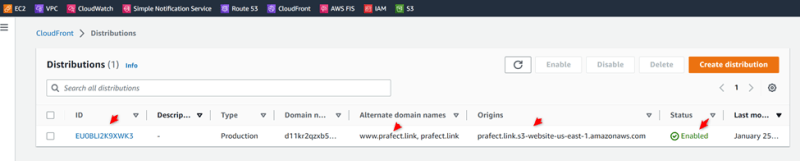
Custom origin

Validate that cloudfront domain is correctly deployed

Access web application using cloudfront url
URL: https://d3hffwkpocdftx.cloudfront.net

Security Checkpoint:
How to Secure AWS S3 web end point and restrict to access the web application allowing access through only Cloudfront web endpoint ?
Go to S3 Bucket policy
Go to Origin
Edit Origin
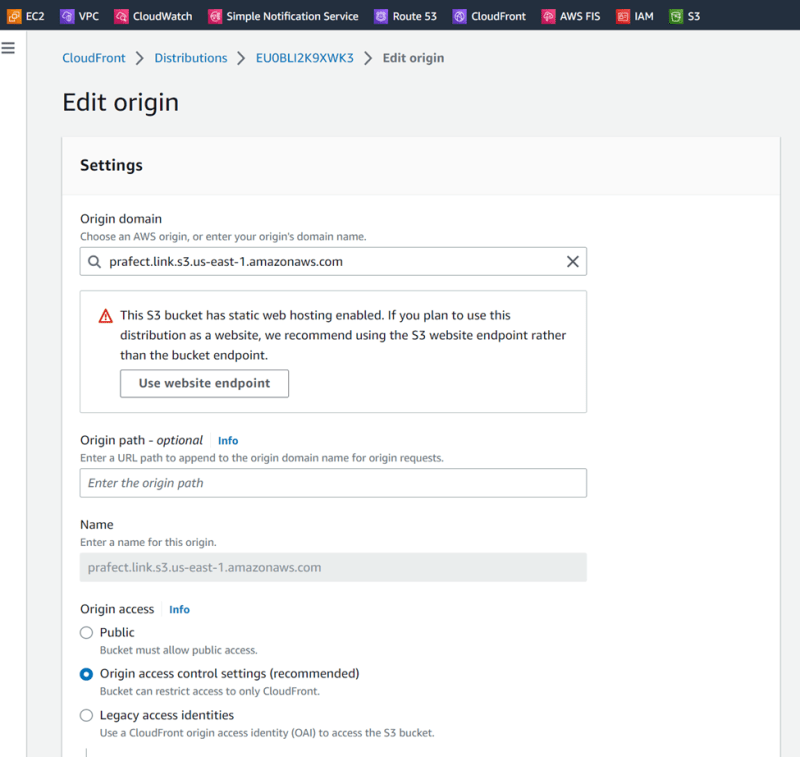

Replace this Bucket policy with cloudfront policy
{
"Version": "2012-10-17",
"Statement": [
{
"Sid": "PublicReadGetObject",
"Effect": "Allow",
"Principal": "",
"Action": "s3:GetObject",
"Resource": "arn:aws:s3:::prafect.link/"
}
]
}
{
"Version": "2008-10-17",
"Id": "PolicyForCloudFrontPrivateContent",
"Statement": [
{
"Sid": "AllowCloudFrontServicePrincipal",
"Effect": "Allow",
"Principal": {
"Service": "cloudfront.amazonaws.com"
},
"Action": "s3:GetObject",
"Resource": "arn:aws:s3:::prafect.link/*",
"Condition": {
"StringEquals": {
"AWS:SourceArn": "arn:aws:cloudfront::914141388779:distribution/EU0BLI2K9XWK3"
}
}
}
]
}
Restrict to access from S3 web endpoint and allow only from cloudfront distribution endpoint


Access Web url:
Expected: it should block the request using S3 endpoint : PASSED

Only allowed using cloudfront endpoint

Point out Cloudfront URL to Route53

Replace the s3 web endpoint with cloudfront endpoint
Delete the record sets
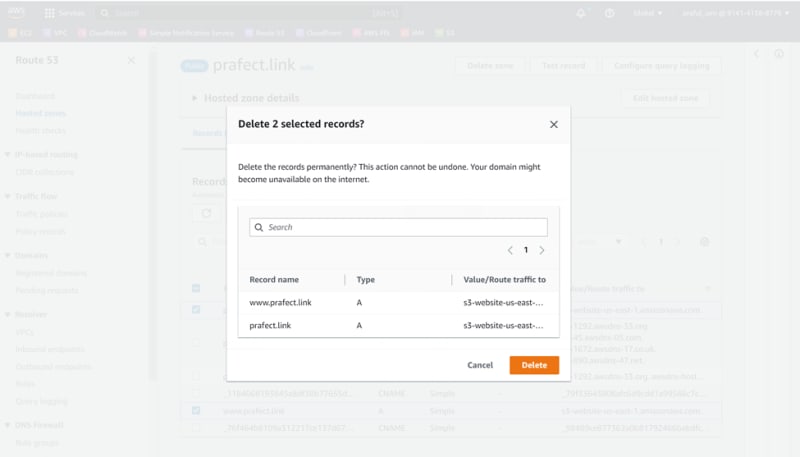
Create New record set for Prafect.link
Routing Policy: Simple Routing
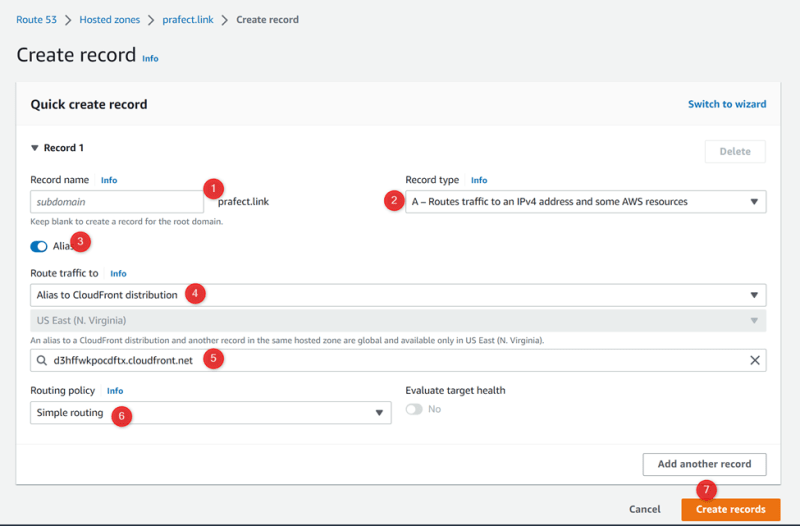
Create New record set for www.Prafect.link
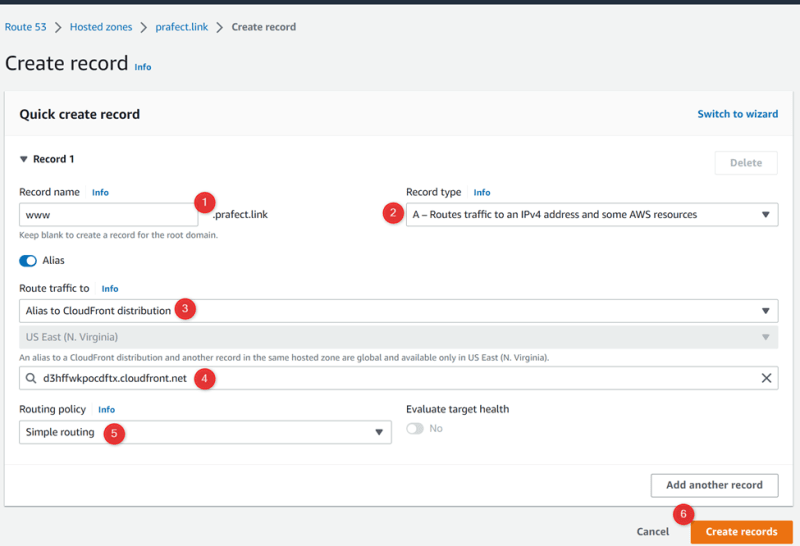
Record sets created successfully
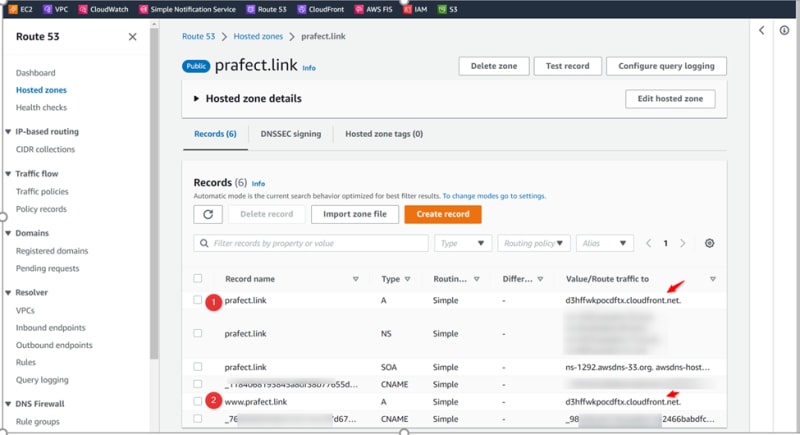
Measure the performance of the web application
Perform Latency test
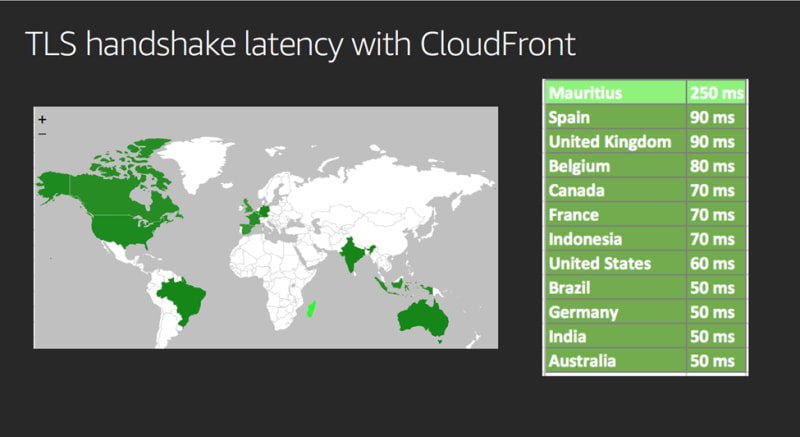


| Origin | Region | Cloudfront | Page | DNS | Connection | SSL | Response |
| Canada | No Cloudfront | Home Page | 189.39 ms | 102.67 ms | |||
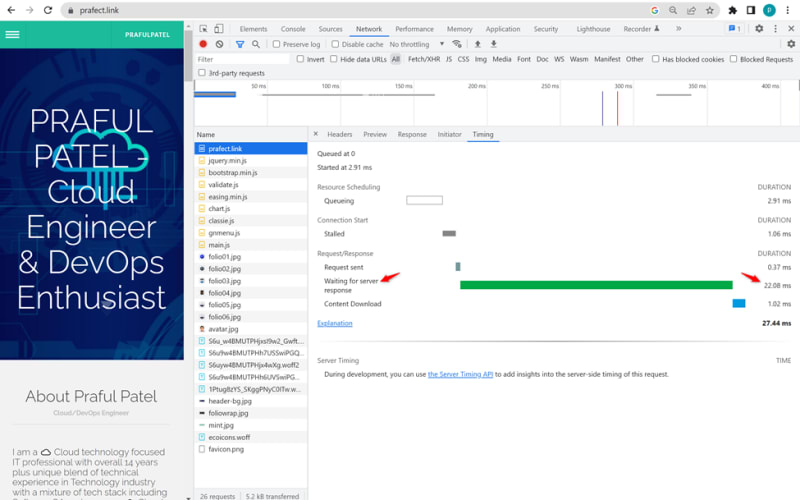
| With Cloudfront | Home Page | 1.06 ms | 22.08 ms | ||||
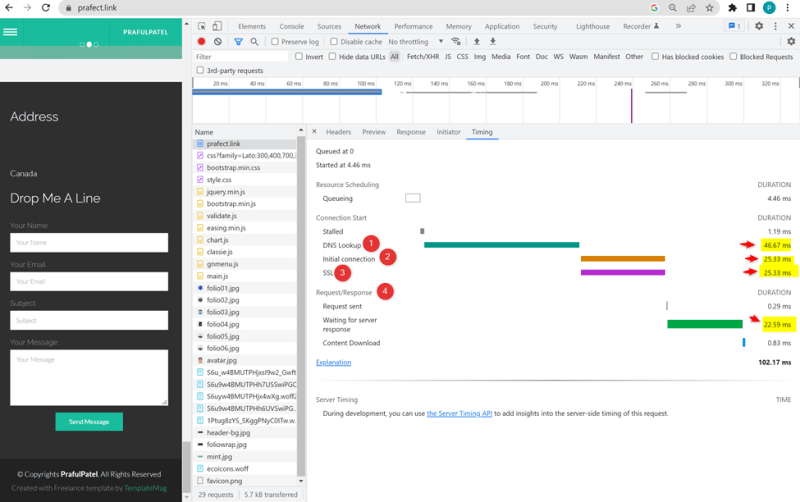
| No Cloudfront | Contact Us | 48.25 ms | 25.33 ms | 22.59 ms | |||
| With Cloudfront | Contact Us | 46.67 ms | |||||
| No Cloudfront | Portfolio | 49.70 ms | 123.31 ms | ||||
| With Cloudfront | Portfolio | 65.42 ms | 25.43 ms | 25.43 ms | 23.75 ms | ||
| London | No Cloudfront | Home Page | 322.29 ms | ||||
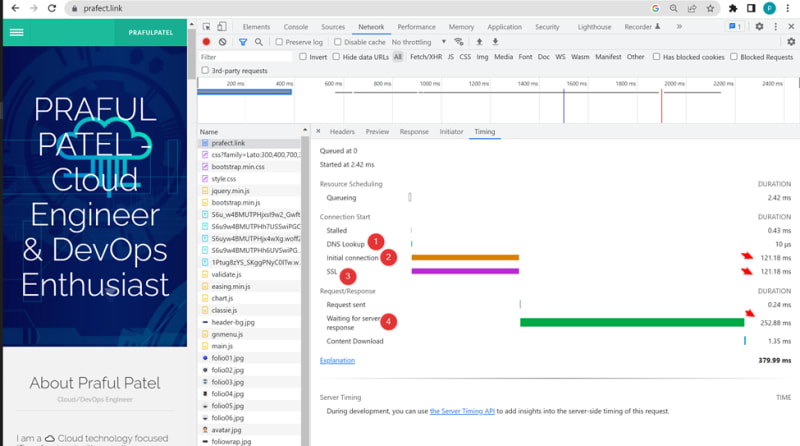
| With Cloudfront | Home Page | 121.18 ms | 121.18 ms | 121.18 ms | 252.88 ms | ||
| No Cloudfront | Contact Us | 347.94 ms | |||||
| With Cloudfront | Contact Us | 122.69 ms | 122.69 ms | 125.31 ms | |||
| No Cloudfront | Portfolio | 533.79 ms | |||||
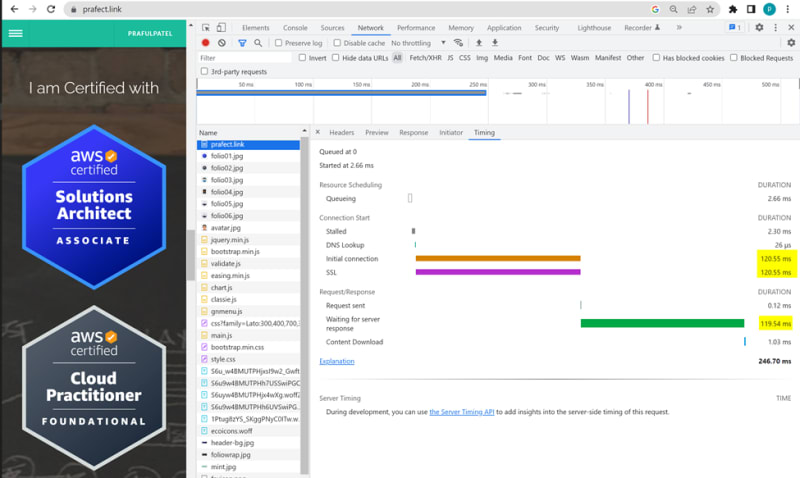
| With Cloudfront | Portfolio | 120.55 ms | 120.55 ms | 119.54 ms | |||
| Singapore | No Cloudfront | Home Page | 789.50 ms | ||||
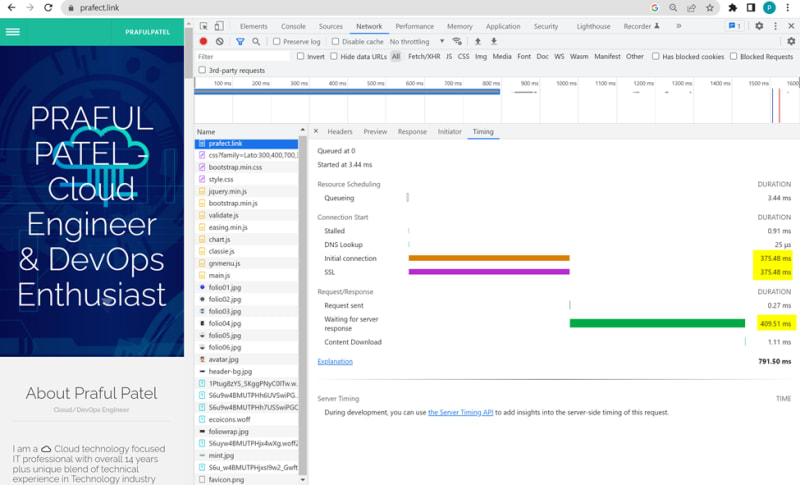
| With Cloudfront | Home Page | 375.48 ms | 375.48 ms | 409.51 ms | |||
| No Cloudfront | Contact Us | 762.48 ms | |||||
| With Cloudfront | Contact Us | 294.09 ms | 388.27 ms | 390.91 ms | |||
| No Cloudfront | Portfolio | 792.65 ms | |||||
| With Cloudfront | Portfolio | 382.05 ms | 382.05 ms | 378.65 ms |
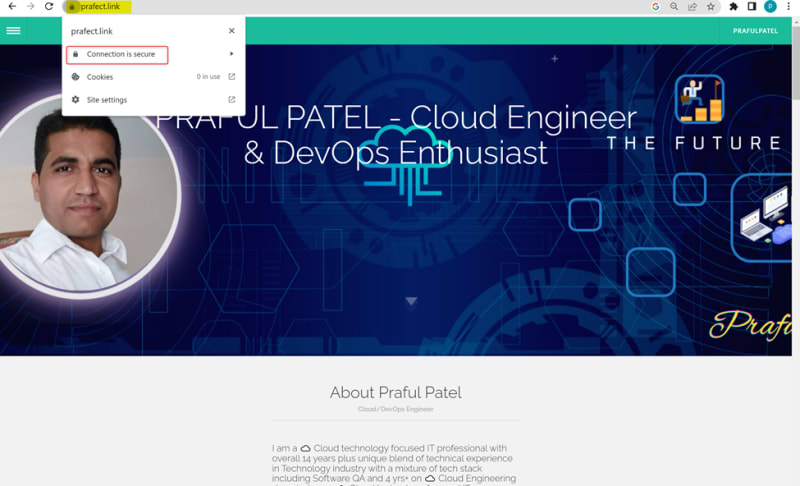
Validate that web application is secure
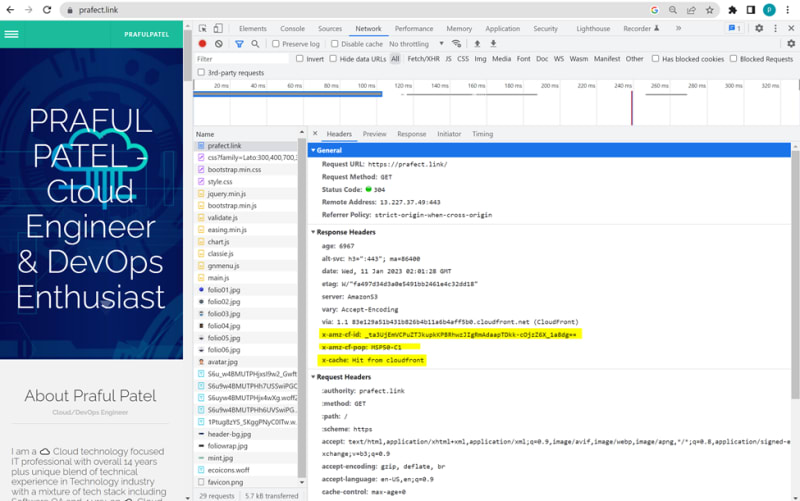
Verify Header that the page is coming from cloudfront cache
Test from Canada
HomePage
About Us
Test from London

Home Page
Contact Us

Portfolio
Test from Singapore
Home Page
Contact Us

Portfolio
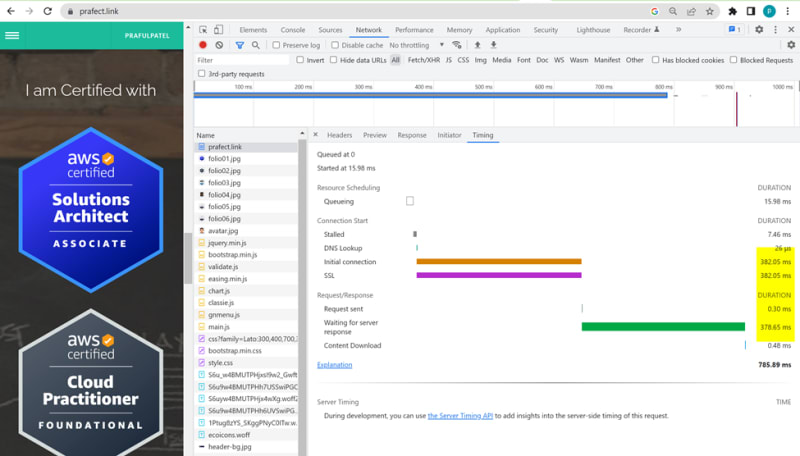
Optimize the Cloudfront performance
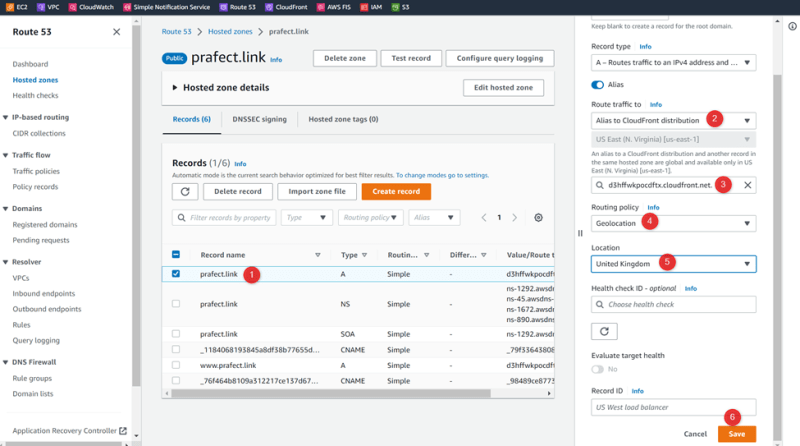
Point DNS to United Kingdom
Change the Routing Policy: Geolocation
Location: United Kingdom
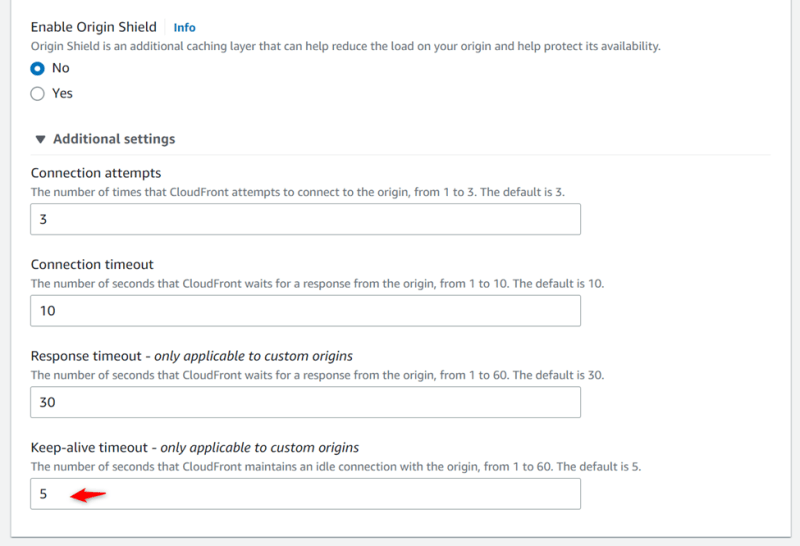
Keep alive time

Change the timeout to 60

Cloudfront speed increase tips:
Cloudfront – Keep alive time need to increate: 60
DNS TTL time – need to increase: 60
SSL time need to increase

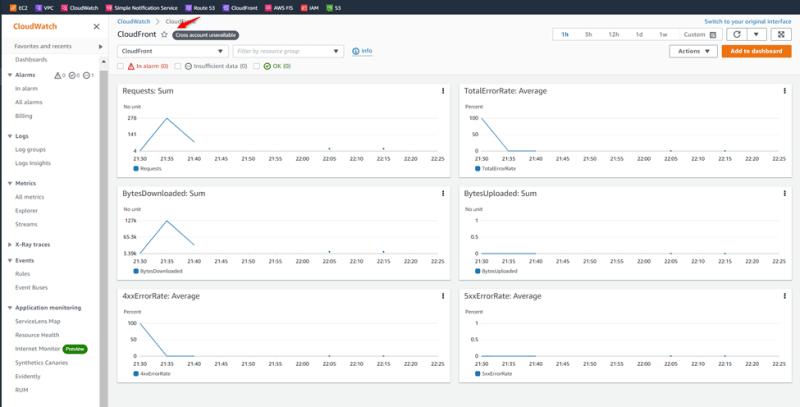
Cloudwatch

NEW RELIC
INTEGRATION
Objective: The objective is to monitor Cloudfront logs using the external monitoring tool New Relic and integrate it with AWS S3. This will be achieved by implementing comprehensive monitoring through an AWS Lambda function. The Lambda function will be configured to trigger and send Cloudfront logs from an AWS S3 bucket to New Relic, providing infrastructure visibility and response monitoring.
Technology & Tools: New Relic, AWS S3, AWS Lambda
New relic
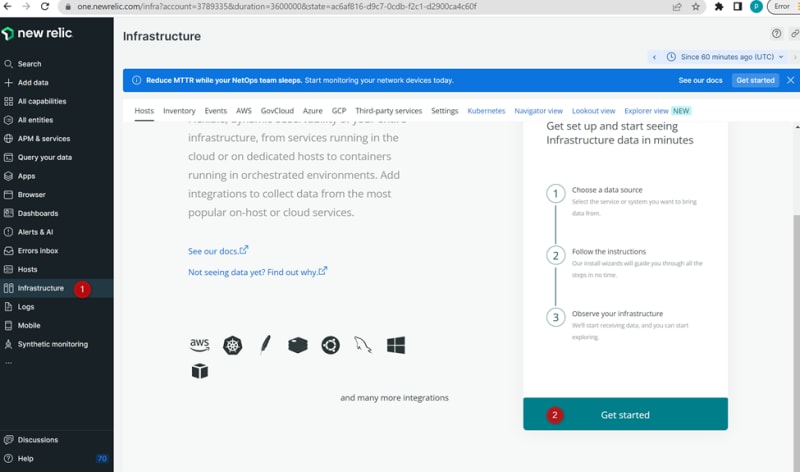
Select AWS

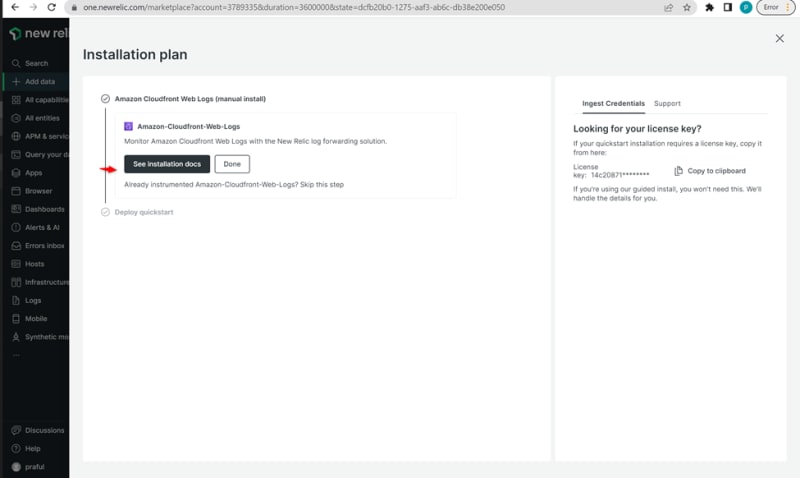
Standard logs
https://docs.newrelic.com/docs/logs/forward-logs/cloudfront-web-logs/#enable-standard-logging
Create logs bucket in S3
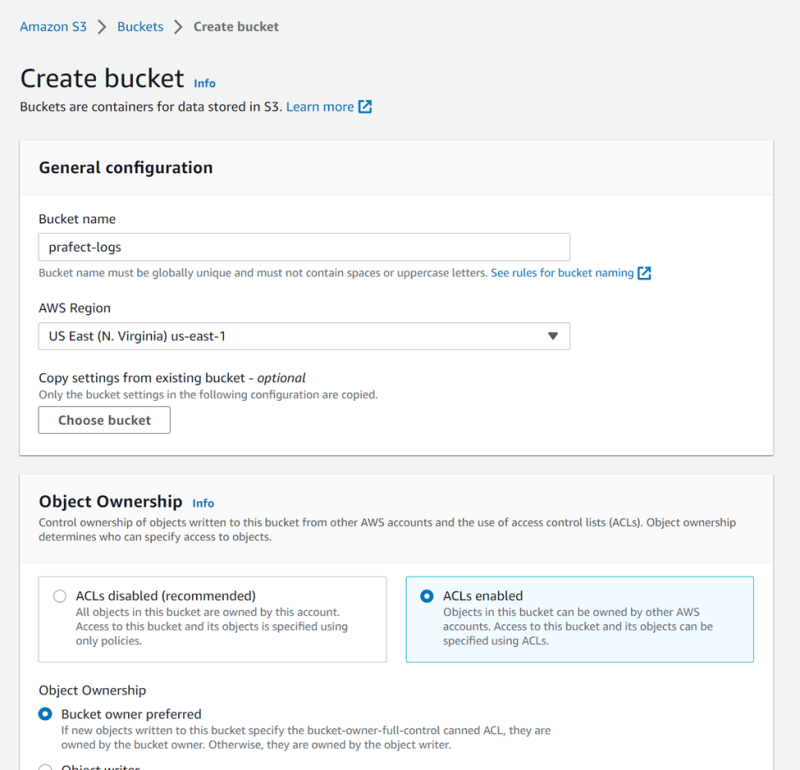
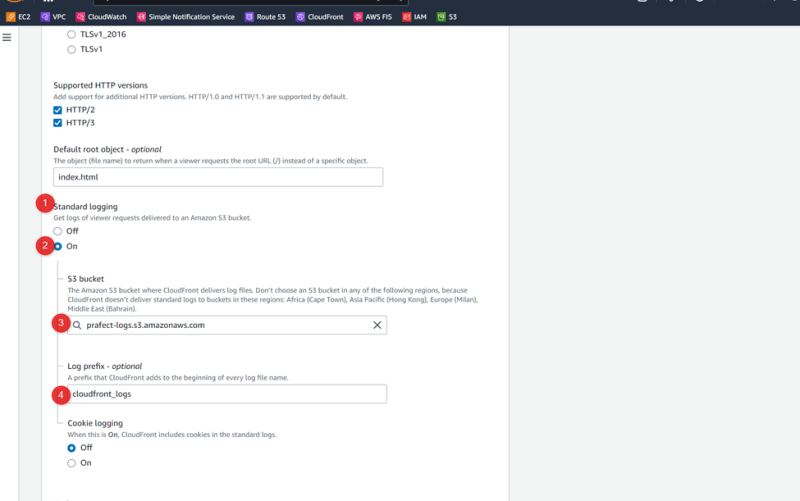
Enable standard logging
Go to Cloudfront Enable standard logging
Go to this link: https://serverlessrepo.aws.amazon.com/applications
Search: newrelic
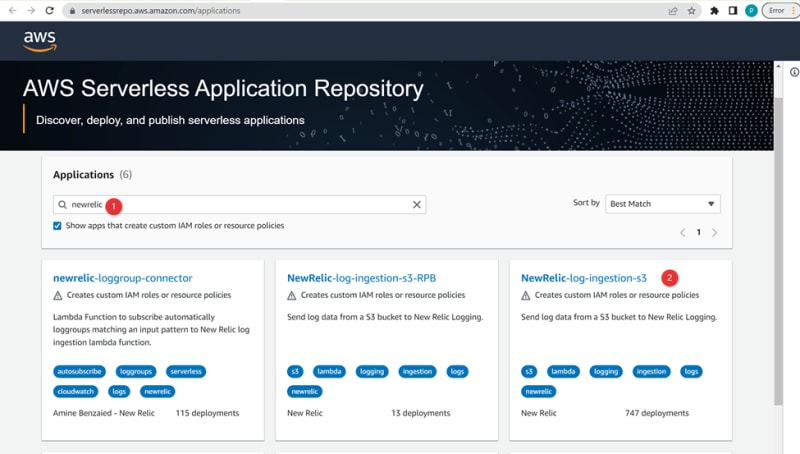
Click :Deploy

1.Scroll to the Application settings and enter your New Relic license key.

Logtype: built in parsing rulesets : https://docs.newrelic.com/docs/logs/ui-data/built-log-parsing-rules/
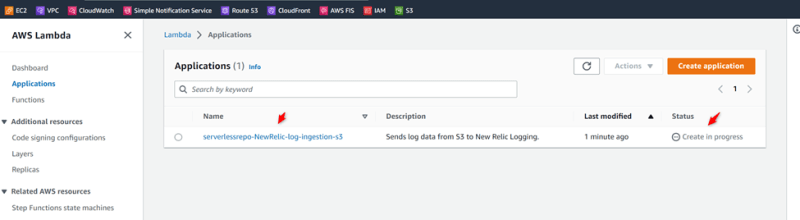
Deployment in progress
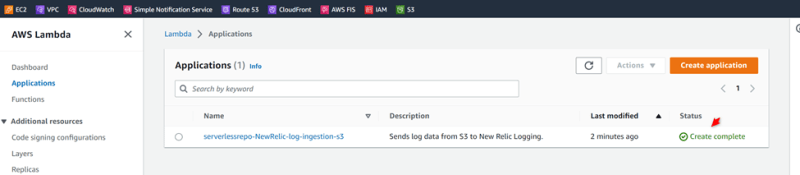
Lambda deployment complete
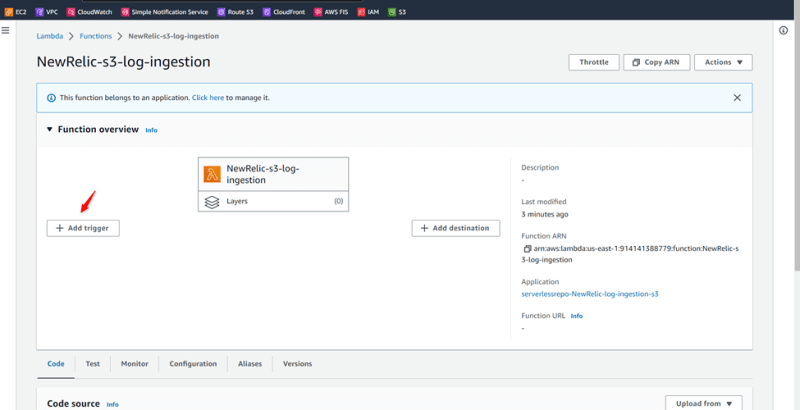
Create Lambda trigger

Add Trigger
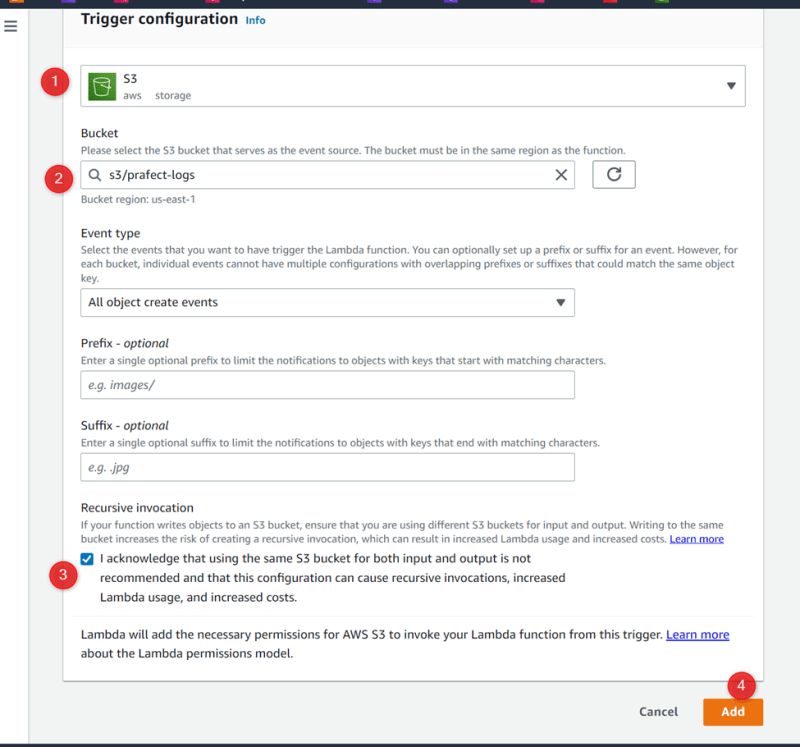
Trigger added successfully

Go back to newrelic
If configure correct it will look like this
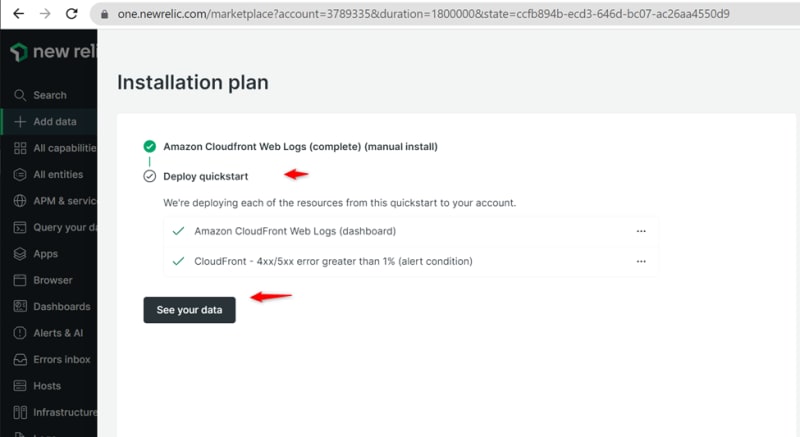
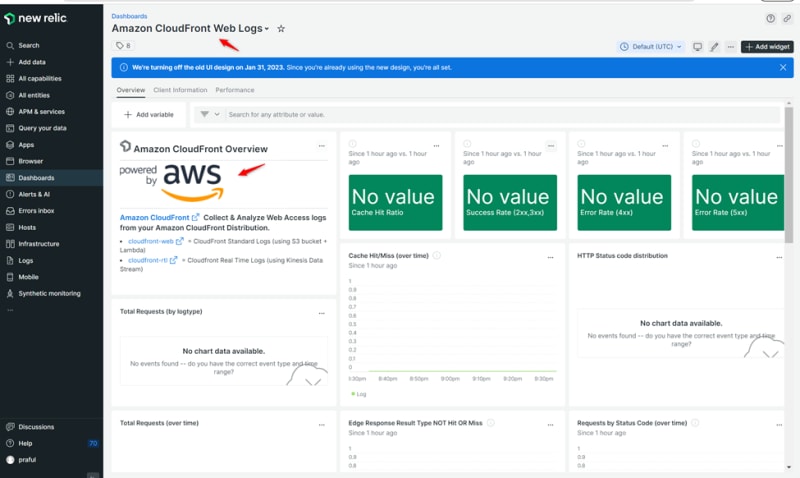
View logs
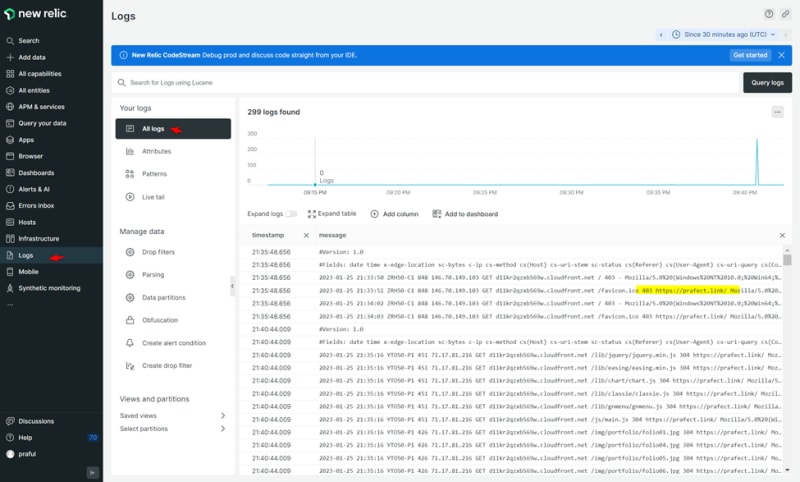

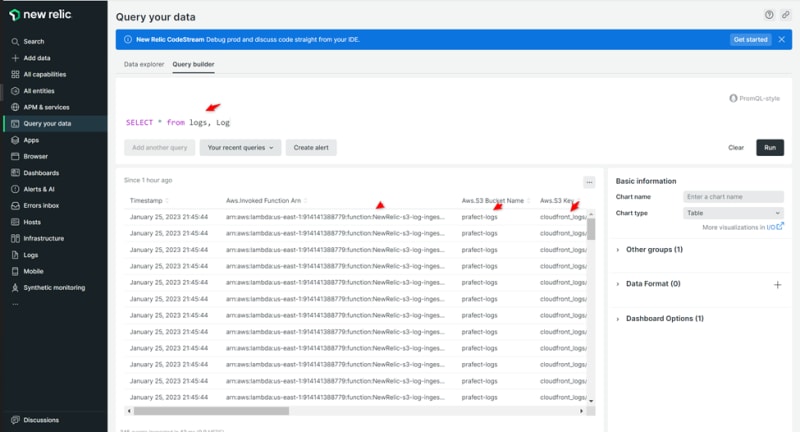
Objective: Automating Web Application Performance Enhancement
Objective: The objective is to automate the provisioning of services and configure CloudFront to improve the performance of a web application.
Technology & Tools: AWS S3, Terraform, CloudFront
Terraform
Terraform project source:
GitHub: https://github.com/prafulpatel16/terraform-aws-tests.git
Project directory: gocloud-test/10-tf-static-web-complete/
WHAT IS TERRAFORM ?
HashiCorp Terraform is an infrastructure as code tool that lets you define both cloud and on-prem resources in human-readable configuration files that you can version, reuse, and share. You can then use a consistent workflow to provision and manage all of your infrastructure throughout its lifecycle. Terraform can manage low-level components like compute, storage, and networking resources, as well as high-level components like DNS entries and SaaS features.
How does Terraform work?
HashiCorp and the Terraform community have already written thousands of providers to manage many different types of resources and services. You can find all publicly available providers on the Terraform Registry, including Amazon Web Services (AWS), Azure, Google Cloud Platform (GCP), Kubernetes, Helm, GitHub, Splunk, DataDog, and many more.
The core Terraform workflow consists of three stages:
Definition: You define resources, which may span multiple cloud providers and services. For example, you might create a configuration to deploy an application on virtual machines in a Virtual Private Cloud (VPC) network with security groups and a load balancer.
Planning: Terraform creates an execution plan describing the infrastructure it will create, update, or destroy based on the existing infrastructure and your configuration.
Application: On approval, Terraform performs the proposed operations in the correct order, respecting any resource dependencies. For example, if you update the properties of a VPC and change the number of virtual machines in that VPC, Terraform will recreate the VPC before scaling the virtual machines.
Implementation Phase:
Phase 1: AWS Cloud Configuration via Terminal
Go to GitBash terminal and execute the command "aws configure."
Provide the IAM user's secret key and secret access key.
Set the AWS region to "us-east-1."
Specify the output type as "json."
Phase 2: Create Terraform Project and Define Terraform Files and Folders
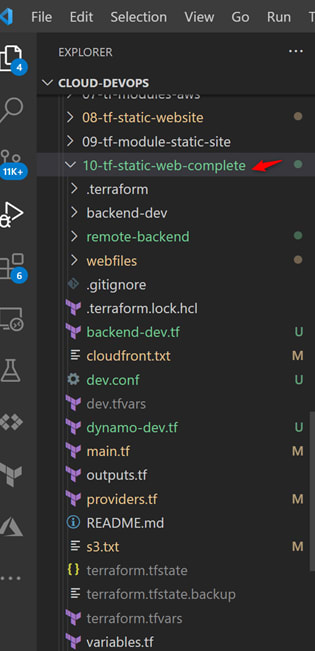
Open Visual Studio Code (VS Code) and create a new folder named "tf-static-web."
Organize the file structure for the Terraform project: a. Create a new file "01-providers.tf." b. Create a new file "02-main.tf." c. Create a new file "03-variables.tf." d. Create a new file "04-outputs.tf." e. Create a new file "terraform.tfvars." f. Create a folder for the web application source code, named "webfiles," and upload the web application files into it.
Save all the created files within VS Code.
Phase 3: Configure and Write Terraform Resources into Respective Files
Open the "01-providers.tf" file and define the Terraform and provider blocks.
Open the "02-main.tf" file and write all the necessary S3 resources.
Open the "03-variables.tf" file and define the variables for dynamic access.
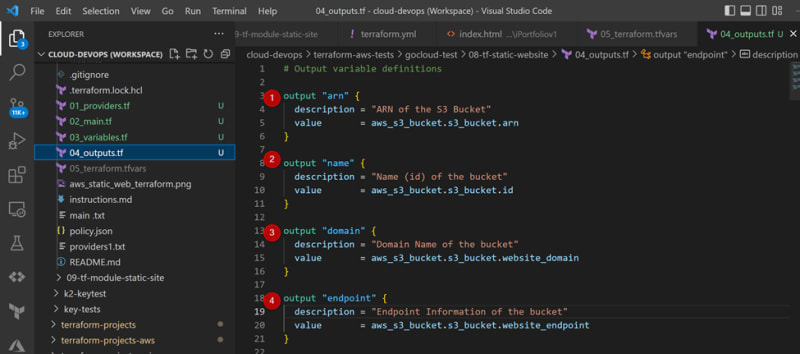
Open the "04-outputs.tf" file and specify the required outputs.
Open the "terraform.tfvars" file and configure variables for dynamic access that will override default variable values.
Phase 4: Terraform fmt, Terraform validate, Terraform plan
Go to the Git Bash terminal and execute the following Terraform commands:
Run "terraform init."
Execute "terraform fmt."
Validate the configuration with "terraform validate."
Apply the configuration with "terraform apply."
Observe that the "terraform.tfstate" is stored locally.
Phase 5: Verify that Resources Are Created in AWS Cloud
Access the AWS S3 console and confirm that the bucket has been created.
Verify that the web files have been uploaded to the bucket.
Confirm that the necessary permissions have been configured.
Ensure that the web endpoint has been created.
Phase 6: Verify that the Web Application Is Accessible Successfully
In the terminal, examine the output values.
Copy the endpoint URL and access it from a web browser.
Confirm that the "index.html" displays the web page.
Validate that the "error.html" is displayed as the error page.
AWS Configuration:
Go to terminal and type
$aws configure
Terraform file structure:

Phase 2: Create Terraform Project and Define Terraform Files and Folders
Open Visual Studio Code (VS Code) and create a new folder named "tf-static-web."
Organize the file structure for the Terraform project: a. Create a new file "01-providers.tf." b. Create a new file "02-main.tf." c. Create a new file "03-variables.tf." d. Create a new file "04-outputs.tf." e. Create a new file "terraform.tfvars." f. Create a folder for the web application source code, named "webfiles," and upload the web application files into it.
Phase 3: Configure and Write Terraform Resources into Respective Files
Open the "01-providers.tf" file and define the Terraform and provider blocks.
Open the "02-main.tf" file and write all the necessary S3 resources.
Open the "03-variables.tf" file and define the variables for dynamic access.
Open the "04-outputs.tf" file and specify the required outputs.
Open the "terraform.tfvars" file and configure variables for dynamic access that will override default variable values.
01_Providers.tf
Terraform block
Providers block
Terraform block
Providers file contains terraform block which includes a “backend” configurations for state file storage and also “required_provisioners” contains a source and version of the terraform provider.Providers block
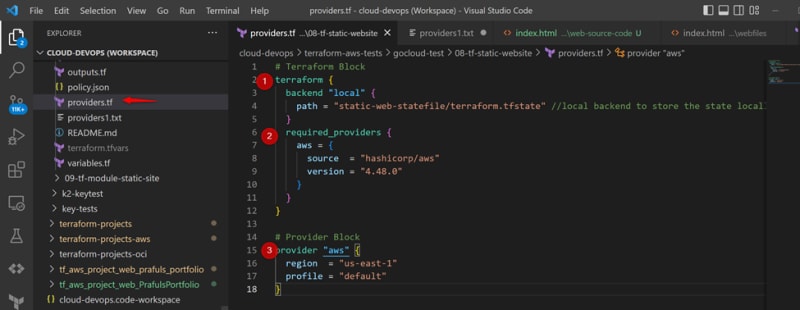
This block contains a cloud providers information about region and profile on which the cloud services needs to be provisioned.
02_main.tf


03_variables.tf

04_outputs.tf
05_terraform.tfvars.tf
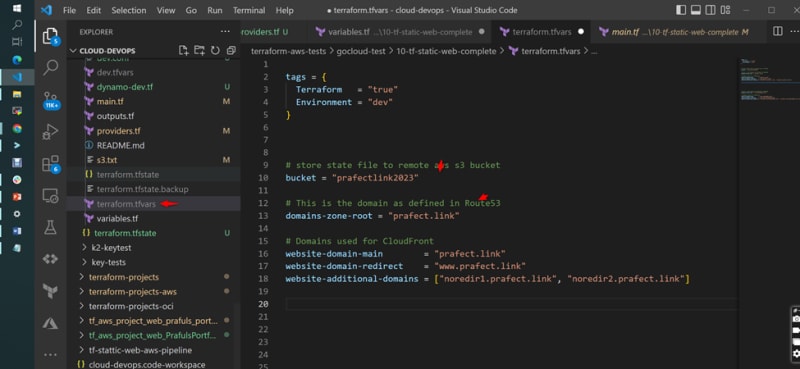
Webfiles

AWS configured successfully
Phase 4: Terraform fmt, terraform validate, terraform plan
1) Go to git bash terminal and apply the terraform commands
2) Terraform init
3) Terraform fmt
4) Terraform validate
5) Terraform apply
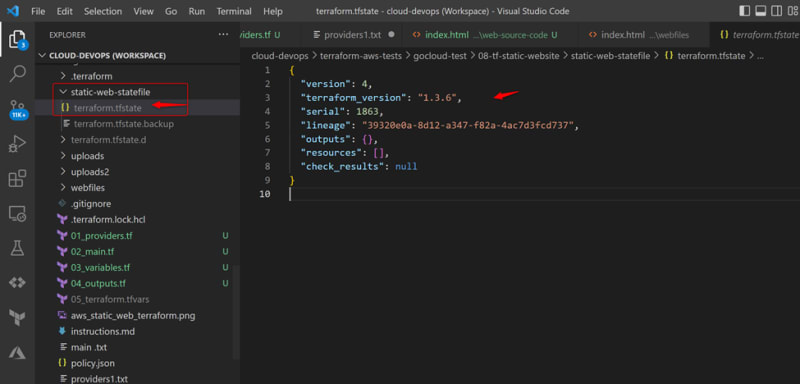
6) Observe that “terraform.tfstate” is stored locally
Terraform init
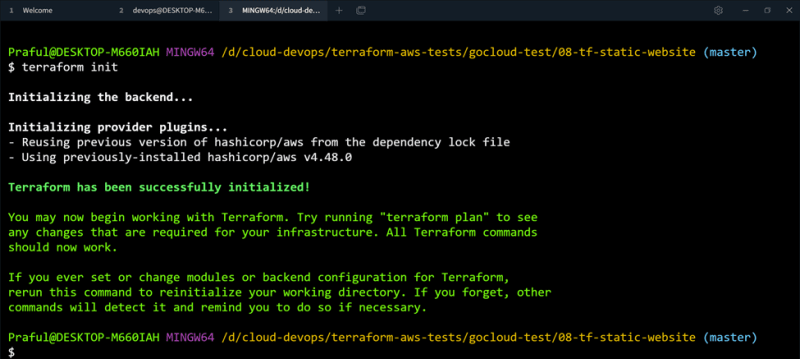
Terraform fmt

Terraform validate
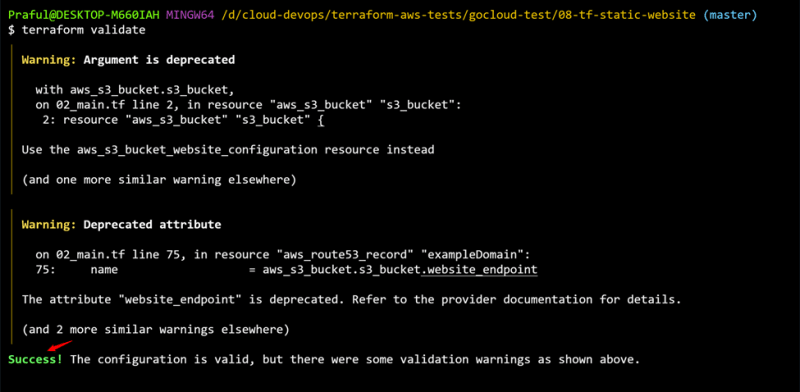

Terraform plan

Terraform apply
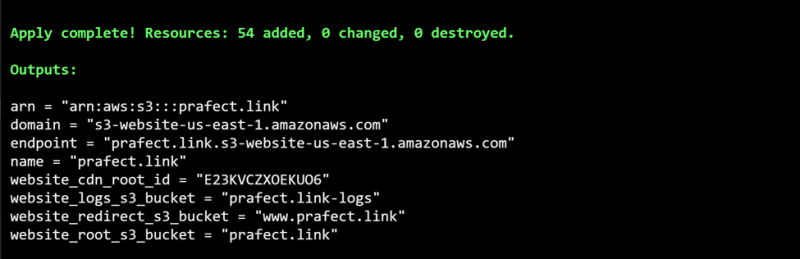
static-web-statefile
Terraform.tfstate
Phase 5: Verify that resources are created In AWS cloud
1) Go to AWS S3 and verify that bucket is created
2) Verify that web files are uploaded into bucket
3) Verify that permission has been created
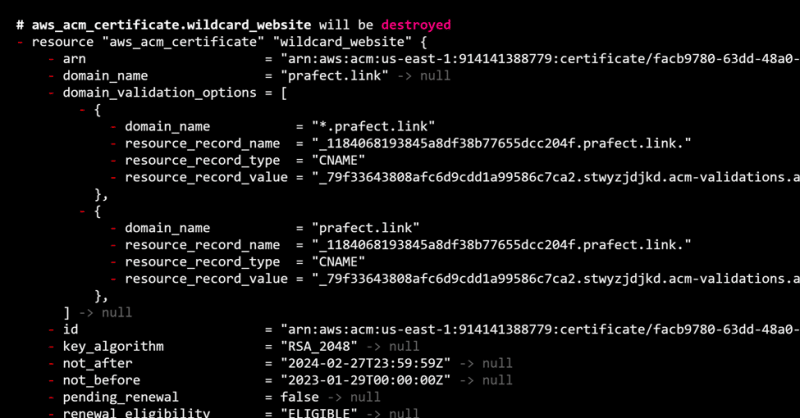
Terraform destroy

4) Verify that web endpoint is created
Phase 6: Verify that web application accessible successfully
1) Go to terminal and observe the outputs value
2) Copy the endpoint url and access from web browser
3) Verify that “index.html” is displayed the web page
4) Verify that “error.html” is displayed the error page
Terraform destroy
Conclusion:
This project successfully optimized web application performance with AWS CloudFront, New Relic, and Terraform. We deployed a secure, globally accessible web app using Terraform's infrastructure as code (IAC). By fine-tuning latency, implementing SSL/TLS, and integrating CloudFront, we significantly improved user experience. Leveraging AWS Lambda, we monitored CloudFront logs and pushed data to New Relic, enhancing infrastructure visibility. This project demonstrates the power of cloud-native solutions and monitoring tools in delivering fast, reliable web applications.
Congratulations!!!! 🔥🚀
Let's Stay Connected:
🌐 Website: Visit my Website
💼 LinkedIn: Connect with me on LinkedIn
🐙 GitHub: Check out my GitHub
🎬 YouTube: Subscribe to my YouTube Channel
✍️ Medium: Read my articles on Medium
AWS #CloudEngineering #CloudComputing #AmazonWebServices #AWSArchitecture #DevOps #CloudSolutions #CloudSecurity #InfrastructureAsCode #AWSCertification #Serverless #AWSCommunity #TechBlogs #CloudExperts #CloudMigration #CloudOps #AWSJobs #TechIndustry #CareerInTech #InnovationInCloud #devops #cloudengineerjobs #devopsjobs #azure #gcp #oci #cloudjobs, #kubernetes
About the author
PRAFUL PATEL ☁️🚀, Highly skilled and motivated Cloud Engineer with a proven track record of designing, implementing, and managing robust cloud infrastructure solutions. With years of hands-on experience, I am deeply passionate about creating scalable and resilient cloud architectures that drive innovation and deliver optimal business outcomes. 🛠 Key Competencies:
Cloud Platforms: AWS, Azure, GCP, OCI Infrastructure as Code: Terraform, Ansible Containers & Orchestration: Docker, Kubernetes Scripting: Python, Bash/Shell CI/CD & Version Control: GitHub, Jenkins, CircleCI Monitoring & Analytics: Grafana, Prometheus, Datadog, New Relic Backup & Recovery: Veeam Operating Systems: Linux, Windows DevOps Tools: AWS Code Build, Code Pipeline, Azure DevOps
📚 Continuous Learning: Staying ahead in the rapidly evolving cloud landscape is my priority. I am committed to expanding my skill set and embracing emerging cloud technologies to drive efficiency and innovation. Passionate Cloud/DevOps enthusiast dedicated to designing, building, and deploying cutting-edge technology solutions. As a devoted YouTuber, I love sharing insights through informative videos and crafting technical blogs that delve into areas like ☁️ Cloud, 🛠️ DevOps, 🐧 Linux, and 📦 Containers. 💻 Open Source Advocate: Contributing to open-source projects is a vital part of my journey. I actively engage in projects centered around Cloud, DevOps, Linux, and Containers, fostering collaboration and innovation within the community. 💌 Let's Connect: I am enthusiastic about virtual collaborations and meeting fellow professionals. Let's explore how I can contribute to your organization's cloud goals. Feel free to connect or DM me.
🌐 Portfolio: Check out my portfolio 🔗 LinkedIn: Connect on LinkedIn 🛠️ GitHub: Explore my projects 🎥 YouTube: Watch my videos 📝 Medium: Read my articles 🌐 Dev.to: Check out my posts
Comments
Join the discussionNo comments yet. Be the first to comment.
AWS Blogs
These blogs cover a variety of use cases and scenarios across different AWS services, providing insights into practical implementations and best practices.


